
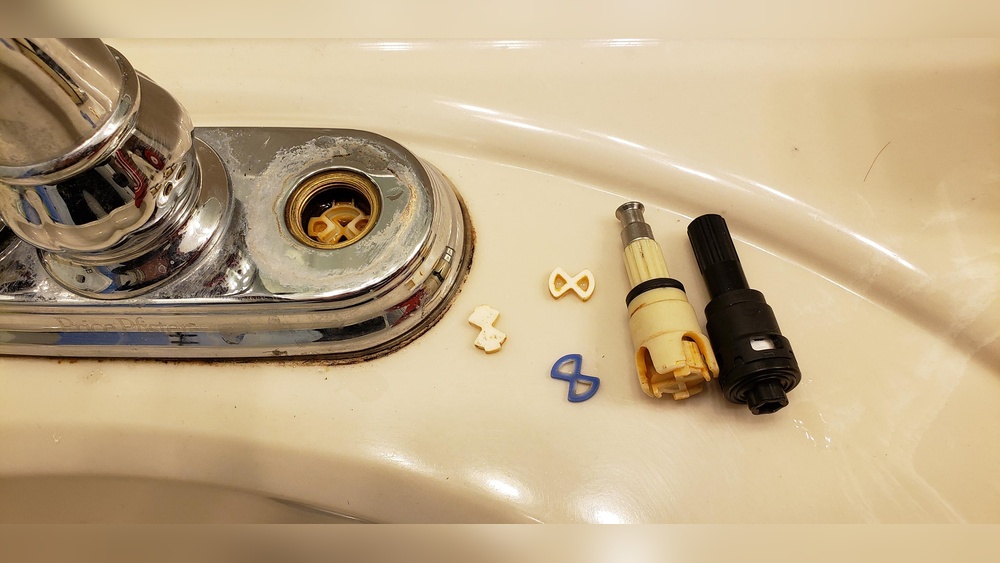
Replacing a Price Pfister bathroom faucet cartridge can seem intimidating, especially if you have never done plumbing work before. But with the right guidance, tools, and some patience, most homeowners can complete this task themselves. Tackling this project not only saves money but also helps you understand your plumbing better. This guide will walk you through each step with clear explanations, pictures in words, and practical tips that help both beginners and DIY enthusiasts. Let\’s explore how to replace a Price Pfister bathroom faucet cartridge confidently and safely, ensuring your faucet works like new.
Why Replace A Faucet Cartridge?
A faucet cartridge is a small but essential part inside your bathroom faucet. It controls the flow and mix of hot and cold water. Over time, cartridges can wear out, leading to problems like leaks, drips, or difficulty turning the handle.
If you notice:
- Water dripping from the spout when the faucet is off
- Stiff or loose handle movement
- Difficulty controlling water temperature or flow
It is likely time to replace the cartridge. Ignoring these issues can waste water and increase your utility bills. In some cases, leaks may damage your sink cabinet or bathroom floor.
Understanding Price Pfister Faucet Cartridges
Price Pfister, now often branded simply as Pfister, is a well-known faucet manufacturer. Their cartridges come in different shapes and types, depending on the faucet model and age.
Common Types Of Price Pfister Cartridges
- Single-handle cartridges – Control both hot and cold water with one handle.
- Dual-handle cartridges – Separate cartridges for hot and cold sides.
- Ceramic cartridges – Durable, found in newer models.
- Compression cartridges – Older type, use rubber washers.
Not every cartridge fits every faucet, so identifying your model is key.
How To Identify Your Cartridge
Look under the sink or on the faucet base for a model number. If you can’t find it, visit the Pfister website or call their support. Bring the old cartridge to a hardware store for a match if unsure.
Tools And Materials You’ll Need
Before starting, gather these essential items:
- Replacement Price Pfister cartridge (correct model)
- Phillips and flathead screwdrivers
- Adjustable wrench or channel-lock pliers
- Allen wrench (hex key) (for some handles)
- Towel or small bucket
- Plumber’s grease (optional but recommended)
- Flashlight
- Old toothbrush or small brush (for cleaning)
- Pen and notepad (for making notes or sketches)
- Needle-nose pliers (sometimes needed for retainer clips)
Having all tools ready prevents delays, especially once water is off.
Preparing For Cartridge Replacement
Preparation makes the job smoother and safer.
Turn Off Water Supply
Under the sink, you’ll find two shutoff valves—one for hot and one for cold. Turn both valves clockwise to close. Test the faucet to confirm water is off. If you don’t have shutoff valves, you may need to turn off the main water supply for your home.
Plug The Drain
A small screw or cartridge part can fall into the drain easily. Use a sink plug or stuff a towel into the drain opening as a precaution.
Clear And Organize Your Workspace
Remove items from under the sink. Lay down a towel to catch drips. Place tools and the new cartridge within easy reach.

Credit: www.homedepot.com
Removing The Old Cartridge
Now, let’s get hands-on.
Step 1: Remove Faucet Handle
Most Price Pfister handles are secured in one of these ways:
- Set screw under handle (use Allen wrench)
- Cap on top of handle (pry off with flathead screwdriver, then remove screw)
Gently wiggle and lift the handle off. Do not force—it can break.
Step 2: Remove Trim And Retaining Clip
Some faucets have a decorative cap or sleeve over the cartridge. Unscrew or slide this piece off.
Look for a retaining clip or nut holding the cartridge in place. Use needle-nose pliers to pull the clip straight out. If there’s a nut, use your wrench to unscrew.
Step 3: Extract The Old Cartridge
Grasp the cartridge stem and pull straight up. If stuck, use pliers. Wiggle gently, as twisting too hard may damage the faucet body.
Expert tip: Mark the orientation of the old cartridge with a marker or photo before removal. This helps install the new one correctly.
Step 4: Inspect And Clean The Area
Check for debris, mineral buildup, or damaged O-rings inside the faucet body. Clean with an old toothbrush. Wipe with a cloth.
If you see cracks or major corrosion, consult a plumber. Sometimes, a deeper issue needs attention.
Installing The New Cartridge
You’re halfway there. Now, let’s put everything back together.
Step 1: Match The New Cartridge
Compare the new and old cartridges side by side. Make sure length, shape, and O-ring positions match exactly. Even a small difference can cause leaks.
Step 2: Lubricate O-rings
Apply a thin layer of plumber’s grease to the cartridge O-rings. This ensures smooth movement and a better seal.
Step 3: Insert The New Cartridge
Align the cartridge with the notches inside the faucet. Gently push it down until fully seated. Refer to your earlier marks or photos for correct orientation.
Step 4: Secure With Clip Or Nut
Reinstall the retaining clip or screw on the nut. Make sure the cartridge does not twist out of position.
Step 5: Replace Trim And Handle
Slide the decorative sleeve or cap back on. Reattach the handle using the screw or set screw. Press the cap back if you removed one.

Credit: www.youtube.com
Testing And Troubleshooting
This is the moment of truth.
Step 1: Turn Water Supply On
Slowly open both hot and cold valves. Check under the sink for drips.
Step 2: Test Faucet Operation
Move the handle(s) through all positions. Water should flow smoothly, with no leaks at the base or spout.
Step 3: Check For Leaks
Look closely around the handle and base. If you see water, turn off the supply and reseat the cartridge. Do not ignore even small drips—they can cause damage over time.
Step 4: Bleed Air From Lines
Sometimes, air in the pipes will cause sputtering. Let water run for a minute to clear it out.
Common Mistakes To Avoid
Many first-timers make small errors that cause frustration. Here’s how to prevent them:
- Skipping water shutoff – Always turn off supply before starting.
- Forcing stuck parts – Use gentle wiggle, not brute force.
- Losing small pieces – Plug the drain and keep screws in a dish.
- Mixing up hot and cold sides – Mark parts if working on both sides.
- Wrong cartridge type – Double-check model compatibility before buying.
- Not cleaning debris – Old mineral buildup can cause leaks, even with a new cartridge.
- Over-tightening – Tighten nuts and screws just enough; too much can crack parts.

Credit: www.youtube.com
Practical Tips For Success
- Take photos during each step, so you remember what goes where.
- If the faucet still drips after replacement, check for scratches or debris on the new cartridge.
- Use only plumber’s grease; other lubricants can damage O-rings.
- If the handle feels stiff, do not force it. Re-seat or lubricate the cartridge.
When To Call A Professional
DIY is rewarding, but know your limits. Call a licensed plumber if:
- The faucet body is cracked or corroded
- The cartridge is stuck and won’t come out
- Leaks continue after careful replacement
- You are unsure about turning off the main water
Plumbers have special tools and experience to handle tough cases.
Example: Comparing Cartridge Types
Understanding the differences between cartridge types can help you choose the right one. Here’s a comparison of common Price Pfister faucet cartridges:
| Cartridge Type | Typical Lifespan | Best For | Signs of Failure |
|---|---|---|---|
| Ceramic Disk | 10-15 years | Modern single-handle faucets | Dripping, stiff handle |
| Compression | 5-8 years | Older dual-handle faucets | Dripping, hard to turn |
| Ball Valve | 8-12 years | Some single-handle models | Inconsistent flow |
Real-world Example: Cost Savings
Hiring a plumber to replace a bathroom faucet cartridge usually costs between $150 and $300. Doing it yourself? Most cartridges cost $10–$40, and you may already have the needed tools. That’s a big saving, especially if you have multiple faucets.
Troubleshooting Table: Quick Reference
If something goes wrong, this chart can help you find the solution quickly:
| Problem | Possible Cause | Solution |
|---|---|---|
| Water still drips | Cartridge not seated, debris, wrong type | Reinstall, clean, check model |
| Handle is hard to turn | No grease, cartridge misaligned | Apply grease, realign |
| Leaks at base | O-ring damaged, nut loose | Replace O-ring, tighten nut |
| Low water pressure | Debris in faucet, supply valve not fully open | Clean faucet, open valves |
Comparing Diy Vs. Professional Replacement
Understanding the pros and cons of doing it yourself versus hiring a pro can help you make the best choice.
| Factor | DIY | Professional |
|---|---|---|
| Cost | $10–$40 (cartridge only) | $150–$300 (labor + parts) |
| Time | 30–90 minutes | 20–60 minutes |
| Skill needed | Basic hand tools | Professional training |
| Warranty | Manufacturer only | Labor warranty included |
| Convenience | Flexible, DIY pace | Hands-off, less risk |
Non-obvious Insights Most Beginners Miss
- Model Numbers Matter: Even within Price Pfister, cartridges can look almost identical but have subtle differences. Always match your old cartridge’s shape and features, not just the brand.
- O-Rings Are Critical: A damaged or missing O-ring causes most leaks after replacement. If your new cartridge doesn’t include new O-rings, buy and replace them separately.
- Don’t Rush Testing: After replacing the cartridge, run the faucet for a few minutes. Watch for slow leaks, which can take time to show.
- Mineral Buildup: In hard water areas, mineral deposits often cause cartridges to stick or leak. Clean the faucet body thoroughly before installing the new part.
Safety And Environmental Considerations
- Always wear protective gloves if you have sensitive skin or are using cleaning products.
- Dispose of the old cartridge responsibly. Many are made of plastic and metal that can be recycled.
- Fixing leaks promptly saves water—up to 3,000 gallons per year for a slow drip, according to the U.S. Environmental Protection Agency.
Where To Buy Replacement Cartridges
You can find Price Pfister cartridges at most hardware stores, home improvement centers, or online retailers. Always buy from a reputable seller. For official products and model lookup, visit the Pfister official website.
Frequently Asked Questions
How Do I Know Which Price Pfister Cartridge I Need?
Check for a model number on the faucet or under the sink. If you can’t find one, remove the old cartridge and bring it to a hardware store for comparison. The Pfister website also has a tool to help match parts by photo.
What Should I Do If The Cartridge Is Stuck?
Spray the area with a little penetrating oil and let it sit for 10–15 minutes. Use gentle wiggling with pliers. Never use excessive force, as you may damage the faucet. If it remains stuck, contact a plumber.
Can I Replace Just The O-rings Instead Of The Whole Cartridge?
If the cartridge is in good shape and only the O-rings are worn, you may replace just the O-rings. However, if your faucet is leaking or stiff, it’s better to replace the entire cartridge for a long-term fix.
How Long Does It Take To Replace A Price Pfister Faucet Cartridge?
For most people, the process takes 30 to 60 minutes. It may take longer if it’s your first time or if parts are corroded or stuck.
Is It Okay To Use Plumber’s Tape On The Cartridge?
Plumber’s tape (Teflon tape) is not needed for cartridge installation. It’s used for threaded pipe joints, not for sealing cartridges. Instead, use plumber’s grease on O-rings for a smooth seal.
Replacing a Price Pfister bathroom faucet cartridge is a practical skill that saves money and water. With careful preparation and the right steps, even beginners can handle this project and enjoy a drip-free faucet for years to come.